瀏覽標籤:

教學

[C#] 使用 AutoMapper 快速轉換有相同資料的 Model

因為工作因素發生了需要將兩個具有相同資料的Model進行轉換,但是如果手動轉換的話太累了,工程師就是懶嘛~
於是乎就拜了Google大神找到了一個名叫AutoMapper套件。


  1. 從NuGet下載AutoMapper
    01
  2. 新增兩組相同的Model
    class Model_1
    {
    	public string Name { get; set; }
    
    	public int Year { get; set; }
    
    	public DateTime Date { get; set; }
    }
    
    class Model_2
    {
    	public string Name { get; set; }
    
    	public int Year { get; set; }
    
    	public DateTime Date { get; set; }
    }
    
  3. 轉換用的方法
    static TModel_2 ConvertModelToModel<TModel_1, TModel_2>(TModel_1 list)
    {
    	Mapper.Initialize(cfg =>
    	{
    		cfg.CreateMissingTypeMaps = true;
    		cfg.CreateMap<TModel_1, TModel_2>().ReverseMap();
    	});
    	Mapper.Configuration.AssertConfigurationIsValid();
    
    	var converted = Mapper.Map<TModel_2>(list);
    	return converted;
    }
  4. 轉換
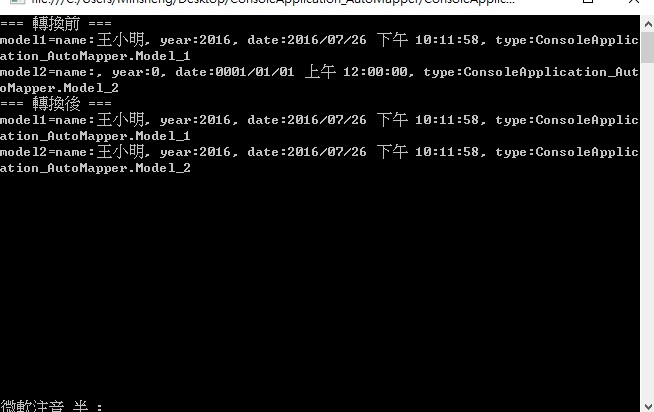
    static void Main(string[] args)
    {
    	Model_1 model1 = new Model_1();
    	Model_2 model2 = new Model_2();
    
    
    	model1.Name = "王小明";
    	model1.Year = 2016;
    	model1.Date = DateTime.UtcNow.AddHours(8);
    
    
    	Console.WriteLine("=== 轉換前 ===");
    	Console.WriteLine("model1=name:{0}, year:{1}, date:{2}, type:{3}", model1.Name, model1.Year, model1.Date, model1.GetType());
    	Console.WriteLine("model2=name:{0}, year:{1}, date:{2}, type:{3}", model2.Name, model2.Year, model2.Date, model2.GetType());
    
    	model2 = ConvertModelToModel<Model_1, Model_2>(model1);
    
    	Console.WriteLine("=== 轉換後 ===");
    	Console.WriteLine("model1=name:{0}, year:{1}, date:{2}, type:{3}", model1.Name, model1.Year, model1.Date, model1.GetType());
    	Console.WriteLine("model2=name:{0}, year:{1}, date:{2}, type:{3}", model2.Name, model2.Year, model2.Date, model2.GetType());
    
    	Console.ReadLine();
    }
  5. 結果
    02


原始碼:https://github.com/shuangrain/ConsoleApplication_AutoMapper


[C#][ASP.NET MVC5] 繼承 AuthorizeAttribute 來實作自訂驗證

有時候會需要頁面會需要依照使用者權限的不同,可以進入的頁面也不同,在MVC裡面有預設Role與User的方式來篩選使用者,不過有時候權限分細一點時就沒辦法應付了,這個時候就需要自訂驗證了。


權限表單的結構資料如下:

01

  1. 先在登入成功的地方放入一段程式,來把使用者有權限進入的頁面以字串的方式存入Session
    using (var db = new SqlConnection(ConfigurationManager.ConnectionStrings["DefaultConnection"].ConnectionString))
    
    {
    	String account = HttpContext.User.Identity.Name.ToString();
    	var list = db.Query<int>(@"
    SELECT 
    [a].[List_Id]
    FROM [dbo].[Permissions] AS [a]
    WHERE [a].[User_Id] = 
    (	SELECT [Id]
    FROm [dbo].[AspNetUsers] AS [z]
    WHERE [z].Email = @Email)", new { Email = model.Email }).ToList<int>();
    
    	Session["Permissions"] = string.Join(",", list.ToArray());
    }


  2. 再來新建一個檔案名為CustomAuthorize.cs,程式碼如下:
    using System;
    using System.Collections.Generic;
    using System.Linq;
    using System.Web;
    using System.Web.Mvc;
    
    namespace WebApplication_CustomVerification.Verification
    {
        public class CustomAuthorize : AuthorizeAttribute
        {
            public int ListId { get; set; }
    
            protected override bool AuthorizeCore(HttpContextBase httpContext)
            {
                if (httpContext == null)
                {
                    throw new ArgumentNullException("httpContext");
                }
    
                //判斷是否已驗證
                if (httpContext.User.Identity.IsAuthenticated == false)
                {
                    return false;
                }
    
                bool boolIsRight = false;
    
                //Session過期,要求重新登入
                HttpSessionStateBase session = httpContext.Session;
                if (session.Count != 0 &&
                    session["Permissions"] != null &&
                    session["Permissions"].ToString() != "")
                {
                    List<string> list = session["Permissions"].ToString().Split(',').ToList();
                    foreach (var item in list)
                    {
                        if (item == ListId.ToString())
                        {
                            boolIsRight = true;
                            break;
                        }
                    }
                }
    
                return boolIsRight;
            }
        }
    }

    這邊覆寫了原本驗證的機制,改成判斷先前存入Session內的字串。

  3. 這樣就可以在Action上面加上標籤來驗證使用者權限囉!
    using System.Web.Mvc;
    using WebApplication_CustomVerification.Verification;
    
    namespace WebApplication_CustomVerification.Controllers
    {
        public class HomeController : Controller
        {
    
            public ActionResult Index()
            {
                return View();
            }
    
            public ActionResult About()
            {
                ViewBag.Message = "Your application description page.";
    
                return View();
            }
    
            public ActionResult Contact()
            {
                ViewBag.Message = "Your contact page.";
    
                return View();
            }
    
            [CustomAuthorize(ListId = 1111)]
            public ActionResult List_01()
            {
    
                return View();
            }
    
            [CustomAuthorize(ListId = 1112)]
            public ActionResult List_02()
            {
    
                return View();
            }
    
            [CustomAuthorize(ListId = 1113)]
            public ActionResult List_03()
            {
    
                return View();
            }
        }
    }


範例程式:https://github.com/shuangrain/WebApplication_CustomVerification

參考:[C#][ASP.NET MVC]自訂AuthorizeAttribute


[C#] 使用 HtmlAgilityPack 搜尋子節點輸出文字時出現亂碼

今天在撈取購物網站資料時發生了一件很詭異的事情,明明在HtmlNodeCollection搜尋時在父節點裡明明就是中文字,但在進行foreach篩選子節點時卻發生原本的中文decode了  !!!!
經過了三四個小時的google與詢問大大,終於有了結果。

  1. 在父節點裡是正常顯示中文01
  2. 到了子節點卻發生decode的現象02
  3. 將字串貼入記事本用IE開啟即正常顯示中文
    &#39208;&#38263;&#25512;&#34214;

    03

解法如下:

  • 使用HttpUtility.HtmlDecode這個方法來恢復正常文字
    HttpUtility.HtmlDecode(nodes_proName[i].InnerText)

    04


[C#] 使用 HtmlAgilityPack 來採集網頁

因為工作需求,所以必須寫一隻小程式來擷取網頁資料,上網Google了一下於是找到了一個好用的套件HtmlAgilityPack,可以迅速的過濾HTML標籤,取得網頁資料。


  1. 從NuGet安裝HtmlAgilityPack 

    01

  2. 讀取網頁(以原價屋為例)
    //指定來源網頁
    WebClient url = new WebClient();
    //將網頁來源資料暫存到記憶體內
    MemoryStream ms = new MemoryStream(url.DownloadData("http://www.coolpc.com.tw/evaluate.php"));
    //使用預設編碼讀入 HTML 
    HtmlDocument doc = new HtmlDocument();
    doc.Load(ms, Encoding.Default);
  3. 原價屋除了商品的類型以外,類型內的選單(select)有做群組分類,為了要將分類與商品所以先建一個Model
    class Product
    {
    	public string type { get; set; }
    
    	public string name { get; set; }
    }
  4. 判斷所要的商品類型(以CPU為例),再擷取該商品類型內選單的分類
    var list_type = new List<string>();
    HtmlNodeCollection nodes = doc.DocumentNode.SelectNodes("//select[@name='n4']//optgroup");
    
    foreach (HtmlNode node in nodes)
    {
    	var type = node.Attributes["label"].Value;
    	list_type.Add(type);
    }
  5. 接下來就要該使擷取商品名稱與價格了
    List<string> list_name = doc.DocumentNode.SelectSingleNode("//select[@name='n4']").InnerText.Split('\n').ToList();
    
    //刪除不必要的非商品選項
    list_name.RemoveRange(0,3);
    list_name.RemoveAt(list_name.Count - 1);
  6. 將商品類型與名稱填入Model
    var models = new List<Product>();
    int number = 0;
    for (int i = 0; i < list_name.Count; i++)
    {
    	string type = list_type[number];
    	string name = list_name[i];
    
    	if (name == "")
    	{
    		number++;
    	}
    	else
    	{
    		models.Add(new Product()
    		{
    			type = type,
    			name = name
    		});
    
    		Console.WriteLine("類型:{0} ,", type);
    		Console.WriteLine("名稱:{0}", name);
    	}
    }
    
    Console.ReadLine();
  7. 執行結果0000


範例程式:https://github.com/shuangrain/ConsoleApplication_HtmlAgilityPack


參考:[ASP.NET][C#]使用HtmlAgilityPack(1) 擷取網頁上的股票


[Windows] 在 Windows Server 2012 R2 上安裝 PPTP Server

有時候需要VPN來遠端使用一些本地服務,或是需要跳板IP的時候,就需要VPN這個服務啦,先前有整理過Linux的VPN安裝教學,這次來整理一下Windows的囉!


安裝腳色

  1. 遠端存取打勾
    螢幕截圖 2016-06-11 16.15.37
  2. 無須異動直接下一步
    螢幕截圖 2016-06-11 16.15.51
  3. 下一步
    螢幕截圖 2016-06-11 16.16.01
  4. DirectAccess與VPN(RAS)打勾
    螢幕截圖 2016-06-11 16.16.10
  5. 會挑出視窗詢問是否安裝下列功能
    螢幕截圖 2016-06-11 16.16.16
  6. 路由打勾
    螢幕截圖 2016-06-11 16.16.20
  7. 點擊安裝
    螢幕截圖 2016-06-11 16.16.35
  8. 安裝過程
    螢幕截圖 2016-06-11 16.16.49


[WordPress] 在Windows Server 2012 R2中使用 Disqus Comment System 連結帳號失敗

最近手賤把Disqus解除帳號連結,卻發現怎麼樣都無法連結帳號,一直顯示Unable to connect to the Disqus API servers如下:

01

拜了Google大神很久都找不到原因,無論重新安裝Windows Server還是使用國外HostGator Web Hosting(Windows)都發生同樣錯誤,忽然想起之前安裝這個外掛的時候也有發生這個問題,後來改用Linux後就正常了,於是乎懷疑是否是作業系統的問題,立即開了虛擬機安裝一台Linux測試,在Linux底下沒有做什麼特別的設定,按下登入馬上就連結成功到Disqus。

個人猜測在Windows裡安裝的php套件少了什麼東西,導致外掛無法正常運作,雖然切回Windows後無法同步留言回Wordpress,但是此外掛還是有正常在運作中可以正常留言,那就先這樣結案吧!


[C#][ASP.NET MVC5] FileUpload 上傳檔案大小的限制

ASP.NET為防止駭客利用大檔案進行DOS(Denial Of Service)攻擊,所以把上傳檔案大小限制在4096KB(4MB),因此當上傳檔案超過4MB時,就會收到System.Web.HttpException 超出最大的要求長度的錯誤訊息如下:

01

那如果需要上傳超過4MB的檔案怎麼辦?那就必須修改Web.configsystem.web讓該站自訂大小,修改內容如下:

<system.web>
	<httpRuntime targetFramework="4.5" maxRequestLength="102400" executionTimeout="600"/>
</system.web>
  • maxRequestLength 檔案大小(KB)
  • executionTimeout 上傳時間(秒)

修改完後雖然不會跳出上面的錯誤了,不過卻跳出另外一個訊息:
04

拜了Google才發現,原來 Windows Server 2008 (IIS 7.0) 上又多了一個 maxAllowedContentLength 屬性 (單位為 Byte),於是乎又打開了Web.config找到system.webServer,修改內容如下:

<system.webServer>
	<security>
		<requestFiltering>
			<requestLimits maxAllowedContentLength="1073741824" />
		</requestFiltering>
	</security>
</system.webServer>

其預設值為 30000000 Bytes (~28.6 MB),所以上傳 30 MB 的檔案就會產生錯誤了。這邊我是修改為1 GB (1024 x 1024 x 1024)可視情況調整。


綜合以上的修改結果為:

02


如果使用者上傳超過設定的最大上限怎麼辦?是不是又會跳出錯誤訊息?不要害怕,只要在Global.asax裡面處理這項錯誤即可,處理方式如下:

protected void Application_BeginRequest(object sender, EventArgs e)
{
	HttpRuntimeSection section = (HttpRuntimeSection)ConfigurationManager.GetSection("system.web/httpRuntime");
	int maxFileSize = section.MaxRequestLength * 1024;
	if (Request.ContentLength > maxFileSize)
	{
		try
		{
			Response.Redirect("~/SizeError.aspx");
		}
		catch (Exception ex)
		{
			Logger logger = LogManager.GetCurrentClassLogger();
			logger.Warn(ex.Message);
		}
	}
}

03


結論:

一個簡單的上傳功能,想不到有這麼多眉眉角角需要注意,做這行真是不容易QQ


參考:

  1. ASP.NET如何設定檔案上傳大小可超過預設4096KB(4MB)
  2. FileUpload 上傳檔案大小的限制
       

[C#][ASP.NET MVC5] 使用 HttpPostedFileBase 檔案上傳

檔案上傳功能在網頁中常常出現,在ASP.NET MVC裡面要上傳檔案非常簡單,這裡簡單筆記一下有關 ASP.NET MVC 的檔案上傳基本操作方法。

  • Controller
    [HttpPost]
    public ActionResult Upload(HttpPostedFileBase file)
    {
    	if (file != null && file.ContentLength > 0)
    	{
    		var fileName = Path.GetFileName(file.FileName);
    		var path = Server.MapPath("~/App_Data/FileUploads");
    		//若該資料夾不存在,則新增一個
    		if (!Directory.Exists(path))
    		{
    			Directory.CreateDirectory(path);
    		}
    		path = Path.Combine(path, fileName);
    		file.SaveAs(path);
    	}
    	return RedirectToAction("Upload");
    }
  • View
    @using (Html.BeginForm("Upload", "Home", FormMethod.Post, new { enctype = "multipart/form-data" }))
    {
        <div class="form-horizontal">
            <div class="form-group">
                <label class="control-label col-sm-2">選擇檔案</label>
                <div class="col-sm-10">
                    <input type="file" name="file">
                </div>
            </div>
            <div class="form-group">
                <div class="col-sm-offset-2 col-sm-10">
                    <input type="submit" value="提交" class="btn btn-primary" />
                </div>
            </div>
        </div>
    }

    這邊要注意的是,如需要使用HttpPostedFileBase上傳檔案的話,則必須添加enctype = "multipart/form-data",不然怎麼樣都沒辦法正常收到資料!
    另外如果使用下列語法是無法接收資料的,因這樣表單並沒有含enctype = "multipart/form-data"這項

    @using (Html.BeginForm("Upload", "Home", new { enctype = "multipart/form-data" }))

    一定要用改為下面的方法

    @using (Html.BeginForm("Upload", "Home", FormMethod.Post, new { enctype = "multipart/form-data" }))


範例程式:https://github.com/shuangrain/WebApplication_Upload