步驟很簡單:
- 新增使用者
sudo adduser exfast
- 給予管理員權限
admin usermod -aG sudo exfast
興趣使然的軟體工程師,擅長 Exception。

步驟很簡單:
sudo adduser exfast
admin usermod -aG sudo exfast


近期都在研究 NetCore 但如果要上 Linux 的話就變成每次都要下指令重建專案 ,剛好有看到 Jenkins 支援 NetCore 且可以省去我在 SSH 上自己下指令的動作,於是乎就跑去研究了一下這塊,這邊留個筆記方便日後查閱。
wget -q -O - https://pkg.jenkins.io/debian/jenkins-ci.org.key | sudo apt-key add -
sudo sh -c 'echo deb http://pkg.jenkins.io/debian-stable binary/ > /etc/apt/sources.list.d/jenkins.list'
sudo apt-get update
sudo apt-get install jenkins
http://localhost:8080 並在 /var/lib/jenkins/secrets/initialAdminPassword 找到的你管理員密碼


管理 Jenkins -> 設定全域安全性
Allow anonymous read access 是沒有打勾的,否則大家都可以亂搞囉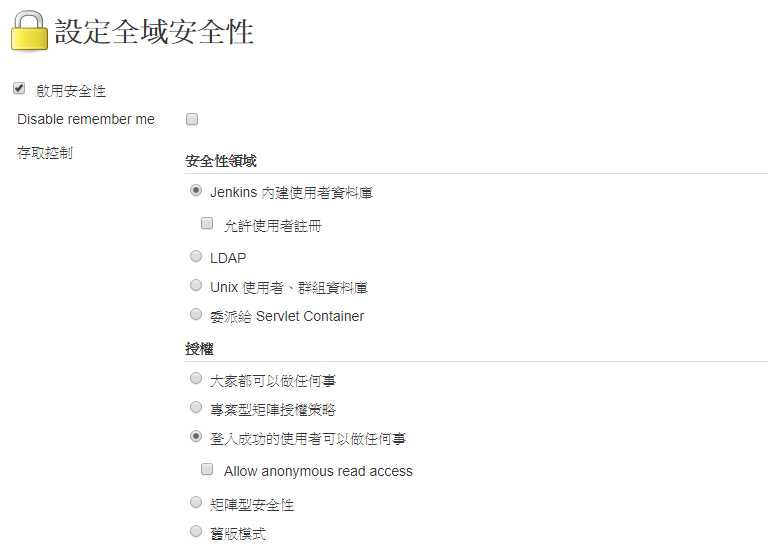

最近裝了個Linux Server想來玩玩看NET Core並佈署到上面,結果發現好多眉眉角角,網路上的文件似乎有點舊讓我一直撞牆撞不停,經過了幾個小時的煎熬最後終於成功了,這裡筆記一下方便下次使用…
首先按照 官網 提供的步驟進行安裝如下:
sudo sh -c 'echo "deb [arch=amd64] https://apt-mo.trafficmanager.net/repos/dotnet-release/ xenial main" > /etc/apt/sources.list.d/dotnetdev.list'
sudo apt-key adv --keyserver hkp://keyserver.ubuntu.com:80 --recv-keys 417A0893
sudo apt-get update
sudo apt-get install dotnet-dev-1.0.4
mkdir HelloWebApp
cd HelloWebApp
dotnet new mvc
Templates清單:
Templates                 Short Name      Language      Tags
----------------------------------------------------------------------
Console Application       console         [C#], F#      Common/Console
Class library             classlib        [C#], F#      Common/Library
Unit Test Project         mstest          [C#], F#      Test/MSTest
xUnit Test Project        xunit           [C#], F#      Test/xUnit
ASP.NET Core Empty        web             [C#]          Web/Empty
ASP.NET Core Web App      mvc             [C#], F#      Web/MVC
ASP.NET Core Web API      webapi          [C#]          Web/WebAPI
Solution File             sln                           Solution
dotnet restore
sudo a2enmod proxy
sudo a2enmod proxy_http
sudo a2enmod proxy_ajp
sudo a2enmod rewrite
sudo a2enmod deflate
sudo a2enmod headers
sudo a2enmod proxy_balancer
sudo a2enmod proxy_connect
sudo a2enmod proxy_html
<VirtualHost *:80>
	ProxyPreserveHost On
	ProxyPass / http://127.0.0.1:5000/
	ProxyPassReverse / http://127.0.0.1:5000/
</VirtualHost>
sudo service apache2 restart
dotnet run
/etc/systemd/system/kestrel-hellomvc.service
[Unit]
Description = https://blog.exfast.me/

[Service]
WorkingDirectory = /home/user/HelloWebApp/
ExecStart = /usr/bin/dotnet run /home/user/HelloWebApp/HelloWebApp.dll
Restart = always
# Restart service after 10 seconds if dotnet service crashes
RestartSec = 10
SyslogIdentifier = dotnet-example
User = user
Environment = ASPNETCORE_ENVIRONMENT = Production

[Install]
WantedBy = multi-user.target
指令:
sudo systemctl stop kestrel-hellomvc
sudo systemctl disable kestrel-hellomvc
sudo systemctl enable kestrel-hellomvc
sudo systemctl start kestrel-hellomvc
sudo systemctl status kestrel-hellomvc
來源:

看到網路上的人都推說,Linux Server使用CentOS架設比較適合,從預設開啟防火牆就知道了,我就來試試看CentOS與目前本站使用的Ubuntu Server差在哪。
apt-get這個指令來安裝,但CentOS是使用yum來安裝套件,這點需要注意一下。首先先更新一下列表吧,使用管理員權限的帳號輸入
sudo yum update -y
-y 是忽略詢問是否同意直接更新
sudo yum install httpd -y
service httpd start
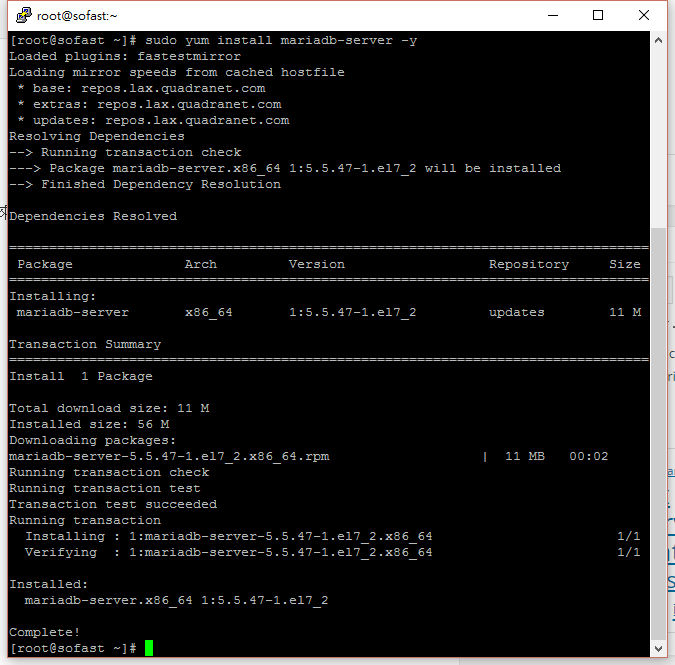
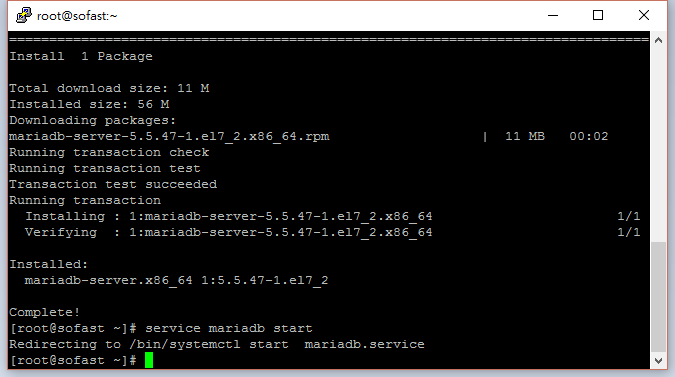
sudo yum install mariadb mariadb-server -y
這樣就安裝成功囉!
service mariadb start
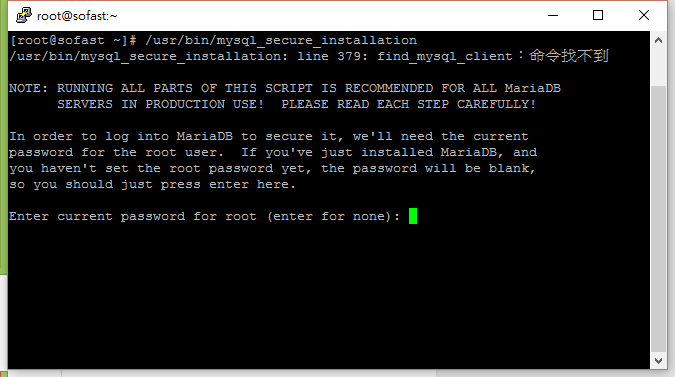
/usr/bin/mysql_secure_installation
這裡因為是第一次安裝,所以直接按Enter繼續即可。
y開始設定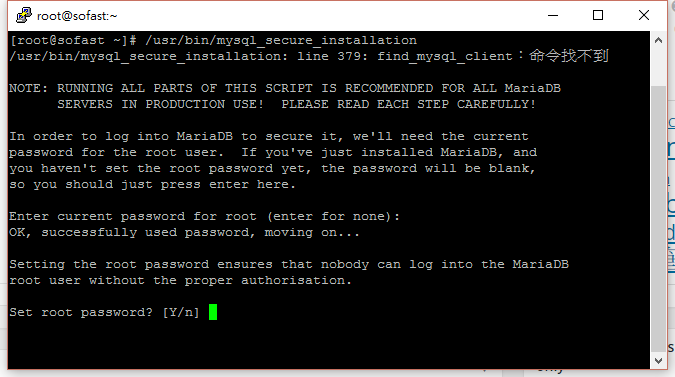
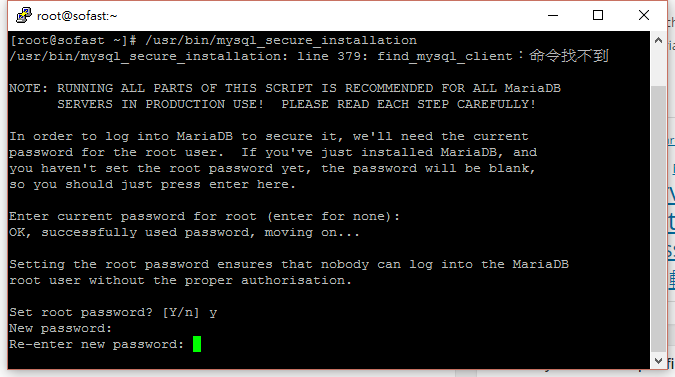
y同意刪除,不然日後會有很多安全性問題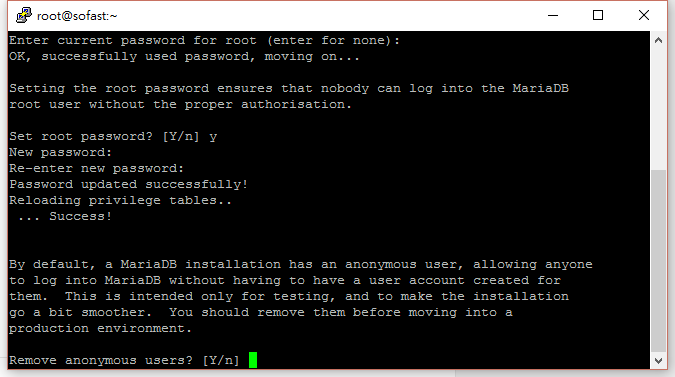
y限制管理員只能從本地連線較為安全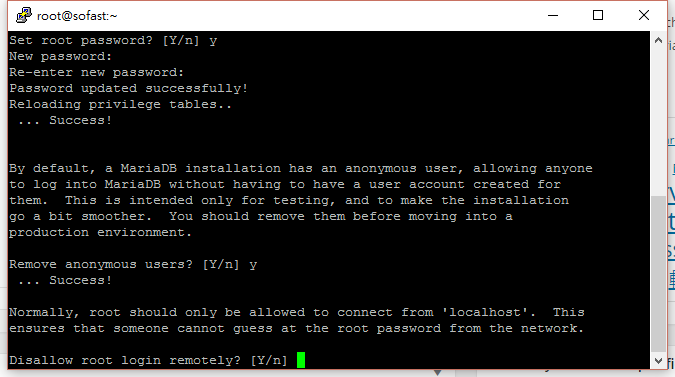
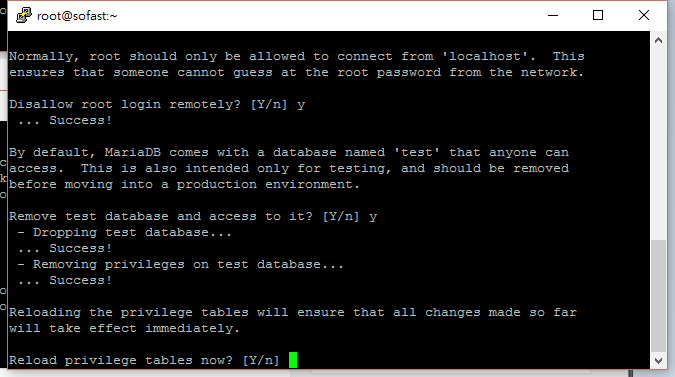
y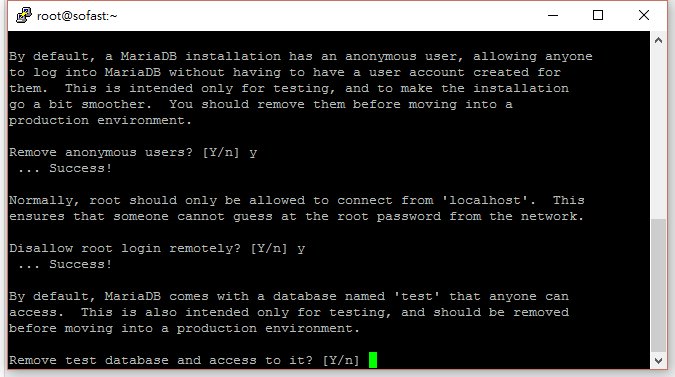
y

sudo yum install php php-mysql -y
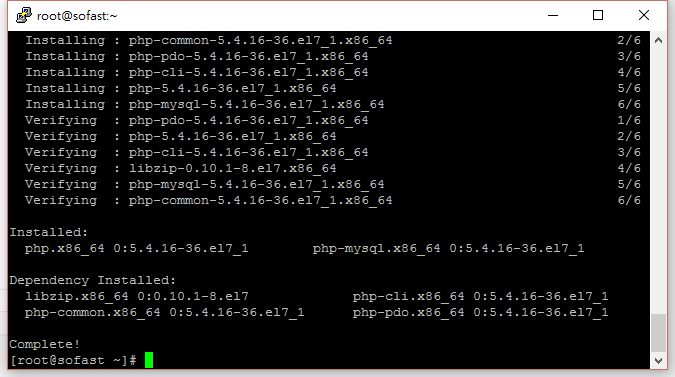
sudo yum install epel-release -y
清除快取
sudo yum clean all -y
更新套件庫
sudo yum update -y
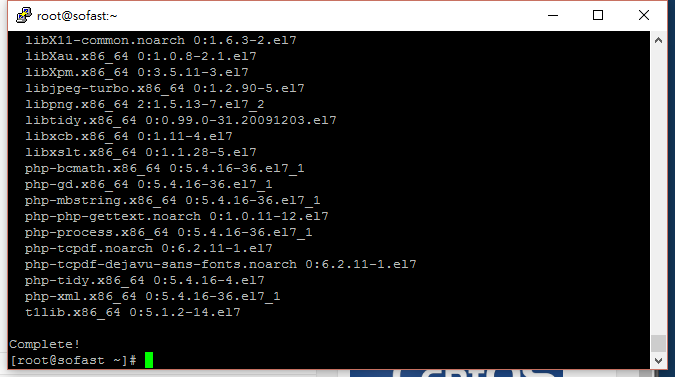
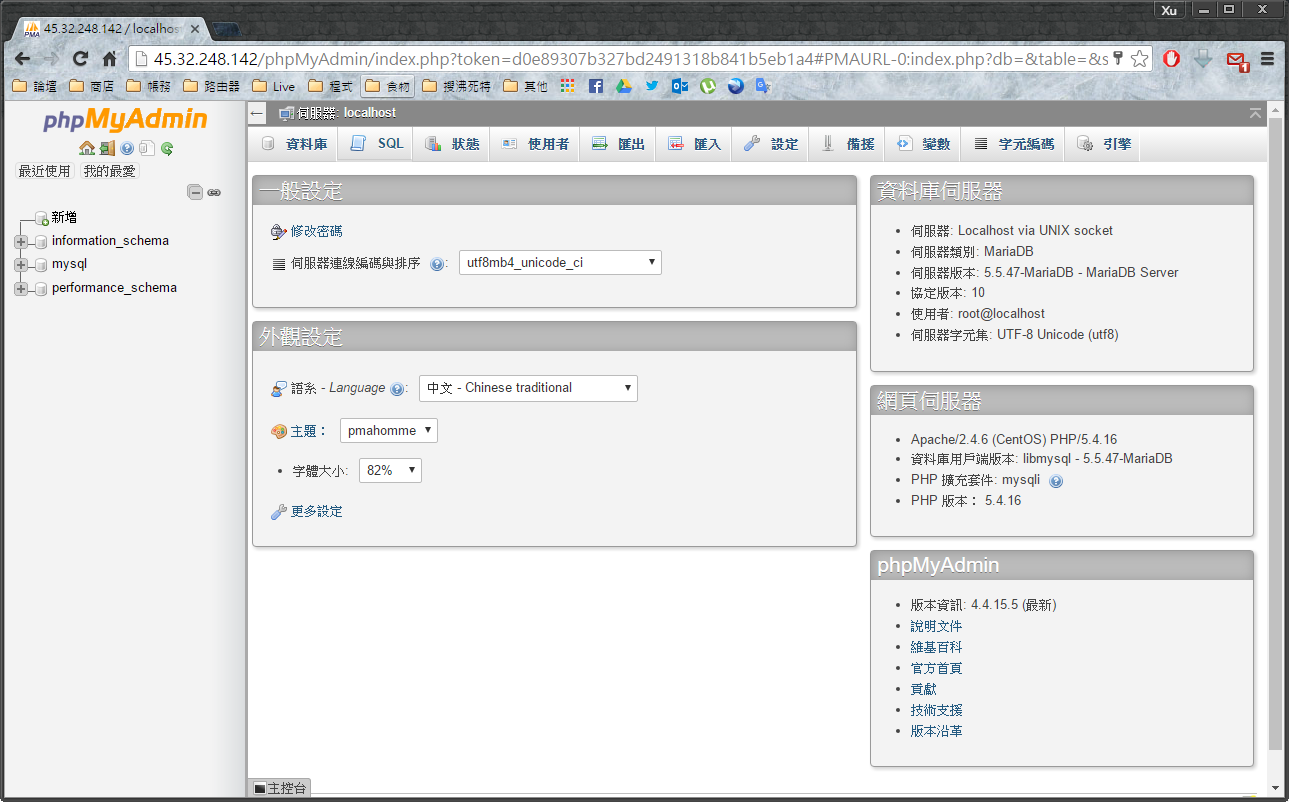
sudo yum install phpmyadmin -y
service httpd restart
sudo firewall-cmd --add-service=http --permanent
sudo firewall-cmd --add-service=https --permanent
查詢防火牆規則
firewall-cmd --list-all --permanent
--permanent為永久規則
service firewalld restart
/etc/httpd/conf.d/phpMyAdmin.conf
<RequireAny>
   Require ip 127.0.0.1
   Require ip ::1
</RequireAny>
在Require ip ::1下方新增自己的IP
<RequireAny>
   Require ip 127.0.0.1
   Require ip ::1
   Require ip 你的IP
</RequireAny>
service httpd restart
每次開機都要手動啟用服務,這樣實在太麻煩了,輸入以下指令可以在每次開機後自動啟用服務
chkconfig httpd on
chkconfig mariadb on
參考:
環境:Ubuntu Server 15.10 x64
剛剛在後台發現一堆連線數以sleep狀態卡在那,
感覺就怪怪的,如果沒有使用的話為什麼不會timeout呢?
查了一下才發現,
SHOW variables;
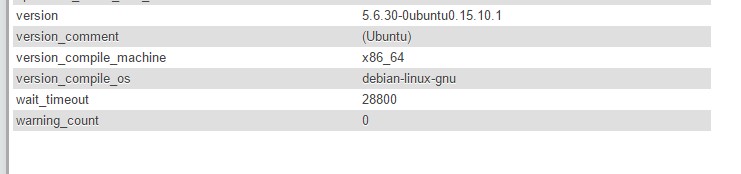
原來mysql預設的數字是八小時…
這也太久了吧,不會造成連線數都卡死嗎??
於是乎開始修改找資料嘗試修改,
不知道為何,我的lamp套件與別人的安裝路徑都不一樣,
最後我是在
/etc/mysql/mysql.conf.d
裡面加上下面這幾行,儲存重開mysql服務後解決
# 防止連線數卡死
wait_timeout = 180
interactive_timeout = 180
參考1:http://note.tc.edu.tw/421.html
參考2:http://dba.stackexchange.com/questions/1558/how-long-is-too-long-for-mysql-connections-to-sleep
在MySQL的安全性預設是禁止外連的,但因為我有一隻程式的資料庫放在這台主機上,所以必須開放服務給程式連線。
/etc/mysql/mysql.conf.d
bind-address
bind-address = 0.0.0.0
service mysql restart
參考:http://askubuntu.com/questions/272077/port-3306-appears-to-be-closed-on-my-ubuntu-server
SSL憑證服務,用於建立瀏覽器和網站伺服器之間的安全通道,提供伺服器身分鑑別及資料傳輸加密。 透過SSL機制建立一個安全通道,保護網路使用者所傳輸的個人資料(如信用卡號、帳號、密碼等)在傳輸過程中不被駭客截取或竄改,保護網站用戶個人資料,強化網路使用者對於網路交易信心。
sudo git clone https://github.com/letsencrypt/letsencrypt /opt/letsencrypt
cd letsencrypt
./letsencrypt-auto --apache -d example.com
若無則手動加入:
<IfModule mod_ssl.c>
    <VirtualHost www.example.com:443>
	#管理者郵箱
	ServerAdmin [email protected]
	#網站名稱
	ServerName abc
	#網站別名
	ServerAlias www.example.com
	#網站的根目錄
	DocumentRoot /var/www/example.com/public_html/
	#網站的錯誤日誌檔存放的位置與檔名
	ErrorLog /var/www/example.com/logs/error.log
	#網站日誌檔存放的位置與檔名
	CustomLog /var/www/example.com/logs/access.log combined
	SSLEngine on
	# Let's encrypt
        SSLCertificateFile /etc/letsencrypt/live/example.com/fullchain.pem
        SSLCertificateKeyFile /etc/letsencrypt/live/example.com/privkey.pem
        SSLCACertificateFile /etc/letsencrypt/live/example.com/fullchain.pem
    </VirtualHost>
</IfModule>