瀏覽標籤:

Linux

Apache 使用 Let’s Encrypt 的 SSL 免費憑證

SSL憑證服務,用於建立瀏覽器和網站伺服器之間的安全通道,提供伺服器身分鑑別及資料傳輸加密。 透過SSL機制建立一個安全通道,保護網路使用者所傳輸的個人資料(如信用卡號、帳號、密碼等)在傳輸過程中不被駭客截取或竄改,保護網站用戶個人資料,強化網路使用者對於網路交易信心。

  1. 下載官方自動安裝憑證程式
    sudo git clone https://github.com/letsencrypt/letsencrypt /opt/letsencrypt
  2. 進入剛剛下載的資料夾
    cd letsencrypt
  3. 將網域輸入(如有多網址則輸入多次,批量會出錯)
    ./letsencrypt-auto --apache -d example.com
  4. 程式會幫你自動加載SSL資料進conf,所以無需做任何設定


若無則手動加入:

<IfModule mod_ssl.c>
    <VirtualHost www.example.com:443>	
	#管理者郵箱 
	ServerAdmin [email protected]
	#網站名稱 
	ServerName abc
	#網站別名
	ServerAlias www.example.com
	#網站的根目錄
	DocumentRoot /var/www/example.com/public_html/
	#網站的錯誤日誌檔存放的位置與檔名
	ErrorLog /var/www/example.com/logs/error.log
	#網站日誌檔存放的位置與檔名
	CustomLog /var/www/example.com/logs/access.log combined
	SSLEngine on
	# Let's encrypt
        SSLCertificateFile /etc/letsencrypt/live/example.com/fullchain.pem
        SSLCertificateKeyFile /etc/letsencrypt/live/example.com/privkey.pem
        SSLCACertificateFile /etc/letsencrypt/live/example.com/fullchain.pem
    </VirtualHost>
</IfModule>
       

利用 Apache 的 htaccess 進行轉址

  1. 設定 httpd.conf
    <Directory "D:/test/">
            AllowOverride All
    </Directory>
  2. 新增文件.htaccess
    RewriteEngine on
    # 不管使用者輸入 sofast.info 或 www.sofast.info,一律導向 blog.exfast.me
    RewriteCond %{HTTP_HOST} ^sofast.info$ [OR]
    RewriteCond %{HTTP_HOST} ^www.sofast.info$
    RewriteRule ^(.*)$ https://blog.exfast.me/$1 [R=301,L]
       

使用 CloudFlare Flexible SSL 服務時 phpMyAdmin 發生錯誤

當使用CloudFlare Flexible SSL免費服務時,phpmyadmin會誤以為你有ssl憑證,自動把網址導向443 port,但其實你用的只是一種中繼的方式,伺服器與CloudFlare溝通時依然是走80 port,所以會發生此錯誤。

解決方案如下:

  1. 開啟以下檔案
    /usr/share/phpmyadmin/libraries/Config.class.php
  2. 搜尋
    ($url['scheme'] == 'https' && $url['port'] != 443)
  3. 把這句判斷式註解掉,如下圖
    01
  4. 解決!

參考:phpMyAdmin uses port 80 on CloudFlare Flexible SSL


[Ubuntu] phpMyAdmin 安裝後發生錯誤

環境:Ubuntu Server 15.10 x64

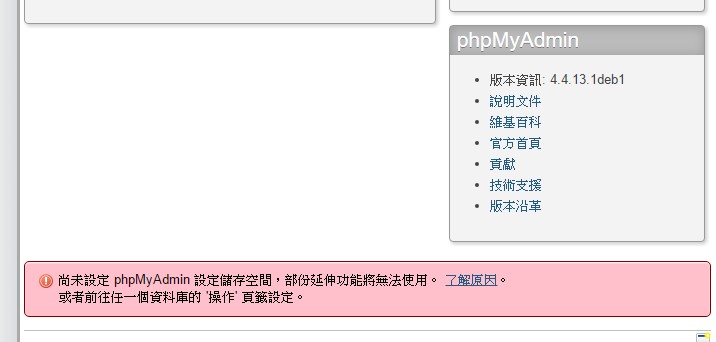
使用sudo apt-get install phpmyadmin安裝後跳出這個錯誤

尚未設定 phpMyAdmin 設定儲存空間,部份延伸功能將無法使用。 了解原因。 或者前往任一個資料庫的 '操作' 頁籤設定。

01
02

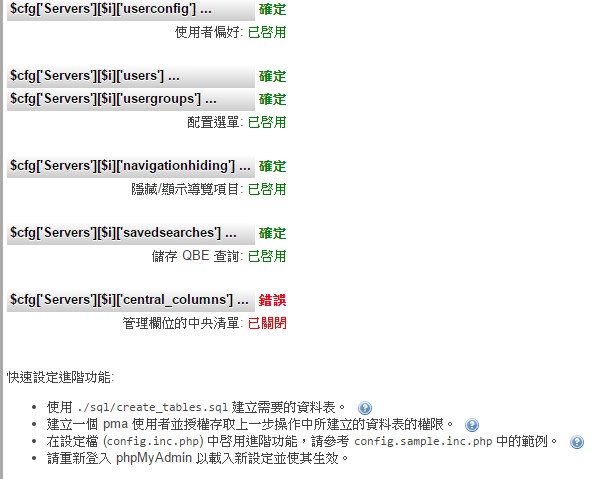
最後發現是config.inc.php少了一行

$cfg['Servers'][$i]['central_columns'] = 'pma__central_columns';

加上去就解決了,上面明明都沒問題,唯獨少了這行,真詭異。


[Linux] Ubuntu Apache新增網域/虛擬網站/虛擬主機

紀錄一下基本的設定檔,以便日後複製用。

  1. 建立設定檔
    在下面的路徑,建立一個檔案名稱叫做 blog.exfast.me.conf 的文字檔

    /etc/apache2/sites-available
  2. 內容如下(範例)
    <VirtualHost *:80>
    	#管理者郵箱 
    	ServerAdmin [email protected]
    	#網站名稱 
    	ServerName sofast
    	#網站別名
    	ServerAlias blog.exfast.me
    	#網站的根目錄
    	DocumentRoot /var/www/blog.exfast.me/public_html/
    	#網站的錯誤日誌檔存放的位置與檔名
    	ErrorLog /var/www/blog.exfast.me/logs/error.log
    	#網站日誌檔存放的位置與檔名
    	CustomLog /var/www/blog.exfast.me/logs/access.log combined
    	<Directory "/var/www/blog.exfast.me/public_html/">
    		AllowOverride All
    	</Directory>
    </VirtualHost>
  3. 建立網站資料夾
    sudo mkdir -p /var/www/blog.exfast.me/public_html
    sudo mkdir -p /var/www/blog.exfast.me/logs
    
  4. 啟用網站
    sudo a2ensite blog.exfast.me
  5. 重新啟動服務
    service apache2 restart

如果要停用網站的話使用以下指令:

sudo a2dissite blog.exfast.me
service apache2 restart

轉載:http://www.arthurtoday.com/2009/11/apache.html


WordPress 資料權限修復

  1. 先進入到wordpress資料夾,以下為我的路徑
    cd /var/www/html/wordpress
  2. 接著輸入以下指令修復資料夾
    sudo chown www-data:www-data -R *

    www-data是Apache使用者
    -R所有次目錄或檔案同時更改檔案擁有者

  3. 修復資料夾權限
    sudo find . -type d -exec chmod 755 {} \;
  4. 修復檔案權限
    sudo find . -type f -exec chmod 644 {} \;

參考:http://stackoverflow.com/questions/18352682/correct-file-permissions-for-wordpress


WordPress 網址刪除醜醜的index.php For Linux – Apache

環境:Ubuntu Server 15.10 x64

  1. 首先,確定 mod_rewrite 已經開啟。
    Apache 的 mod_rewrite 功能預設是關閉的,透過以下指令來啟動覆寫功能。

    sudo a2enmod rewrite
  2. 接著,修改 Apache 的主要設定檔。
    如果伺服器 Apache 配置多個網域,請找到 WordPress 對應的設定檔。
    如果沒有修改過,設定檔在 Ubuntu 的預設路徑為:

    /etc/apache2/sites-available/000-default.conf
  3. 使用 vi 或 nano 指令編輯檔案,
    主要設定檔的開頭應該是 在它上方加入這段:

    <Directory "/var/www/wordpress/">
        AllowOverride All
    </Directory>
    
  4. 接者重新啟動Apache
    sudo service apache2 restart
  5. 修改.htaccess檔案,內容如下
    # BEGIN WordPress
    <IfModule mod_rewrite.c>
    RewriteEngine On
    RewriteBase /wordpress/
    RewriteRule ^index\.php$ - [L]
    RewriteCond %{REQUEST_FILENAME} !-f
    RewriteCond %{REQUEST_FILENAME} !-d
    RewriteRule . /wordpress/index.php [L]
    </IfModule>
    # END WordPress
    

轉:http://diary.taskinghouse.com/posts/664222-resolved-wordpress-permalinks-404-error